ParaView
An open-source, multi-platform data analysis and visualization application.
Introduction
ParaView is an open-source, multi-platform data analysis and visualization application. ParaView users can quickly build visualizations to analyze their data using qualitative and quantitative techniques. The data exploration can be done interactively in 3D or programmatically using ParaView's batch processing capabilities.
ParaView was developed to analyze extremely large datasets using distributed memory computing resources. It can be run on supercomputers to analyze datasets of exascale size as well as on laptops for smaller data.
Installed Version
Currently, version 5.1.2 compiled with Intel/2017a against the Intel MPI library and OSMesa 12.0.2 is installed on the clusters.
Usage
On the clusters, ParaView is to be used in the client-server mode. A parallel ParaView server is launched on compute nodes by the user and the client is launched on your desktop PC to control and view the visualization. Download the ParaView client application for your OS here.
Warning
Your version must match the version number installed on the cluster.
Launching Server
To launch the server, you must first allocate compute nodes, for example:
$ salloc -p qprod -A PROJECT_ID --nodes=2 --time=01:00:00 --x11
to launch an interactive session on 2 nodes. For details, refer to Job Submission and Execution section.
After the interactive session is opened, load the ParaView module:
$ ml ParaView/5.1.2-intel-2017a-mpi
Now launch the parallel server, with the number of processes equal to the number of nodes times 24:
$ mpirun -np 48 pvserver --use-offscreen-rendering
    Waiting for client...
    Connection URL: cs://r37u29n1006:11111
    Accepting connection(s): r37u29n1006:11111i
Note that in this case, the server is listening on the compute node r37u29n1006, we will use this information later.
Client Connection
Because a direct connection is not allowed to compute nodes on clusters, you must establish an SSH tunnel to connect to the server. Choose a port number on your PC to be forwarded to ParaView server, for example 12345. If your PC is running Linux, use this command to establish an SSH tunnel:
Barbora: $ ssh -TN -L 12345:r37u29n1006:11111 username@barbora.it4i.cz
Replace username with your login and r37u29n1006 with the name of the compute node on which your ParaView server is running (see the previous step).
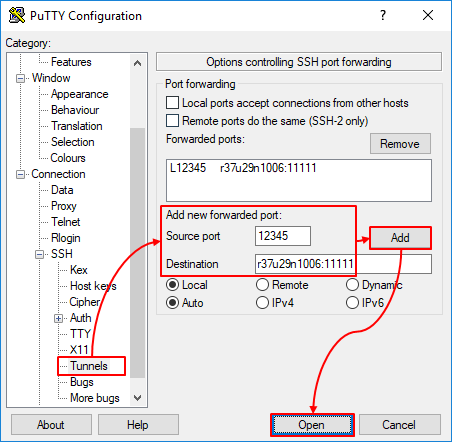
If you use PuTTY on Windows, load Barbora connection configuration, then go to Connection -> SSH -> Tunnels to set up the port forwarding.
Fill the Source port and Destination fields. Do not forget to click the Add button.

Now launch ParaView client installed on your desktop PC. Select File -> Connect... and fill in the following :

The configuration is now saved for later use. Now click Connect to connect to the ParaView server. In your terminal where you have the interactive session with the ParaView server launched, you should see:
Client connected.
You can now use Parallel ParaView.
Close Server
Remember to close the interactive session after you finish working with the ParaView server, as it will remain launched and continue consuming resources even after your client is disconnected.